Fishing Hook
You don’t have to be a professional fisherman, but you should know a few things before you set out on your first fishing trip in Daytona Beach. Although you will need to know how to hold a fishing rod and cast a line, as well as how to tie a fishing hook to make your fishing trip successful, it is not necessary to do so.
Learn how to tie fishing hook
These top fishing knots will help you get the best out of your trip to Ponce Inlet. You will be able to:
- Reel in big fish
- Correctly hook fish
- Reduce your hooks
- You will have less frustration on the water
Ten Ways to Securely Tie your Fishing Hook
Although it might seem like a small step, there are many strategies and variations for tying good knots. Top fishing pros have proven these knot types to be stable, secure and strong. You’ll be an expert when you set out to enjoy top-notch Daytona Beach Fishing.
1. The Knotless Knot
The Knotless Knot fishing hook is a quick and simple solution.
Step 1: Cut the line to the size you prefer and then loop the end.
Step 2: Secure the loop (this is the part that will serve as the bait).
Step 3: From front to back, insert the other end through the eye. (You can find the length of the hook’s shank.
Step 4: Hold the shank, wrap the line around 6-8 more times, moving towards the leader line and the fishing hook.
Step 5: Next grab the other end and push it through the hook’s eye from the front to the back.
Step 6: Now it is time to secure your knot. To complete the knot, moisten it by holding the fishing hook and looped end of the line tightly.
2. The Improved Clinch Knot
Another popular, extremely durable knot is the Improved Clinch Knot. It can withstand the weight of large Ormond Beach fish such as Bull Redfish or Gator Trout. There are many other great things to do in Daytona Beach if you plan a fishing trip.
Step 1: Pass the working end through the eye. Wrap it around the body of the line (not the hook), 5-7 times.
Step 2: Pass the end through the loop near the eye, and then bring it through the section loose.
Step 3: Pull the ends together to tighten, and trim any excess line at the working end.
3. The Palomar Knot
Some of the other knots may be used for sinkers and lures but the Palomar Knot should be used only to secure the fishing line. This is especially great for braided line.
Step 1: Fold your fishing line over to create a loop. The loop should be threaded through the eye of the fishing hook.
Step 2: Secure an overhand knot using slack.
Step 3: Turn the loop around the end the fish hook.
Step 4: Pull the line and fasten it.
4. Fishing Hook Dropper Loop
The Dropper Loop is primarily used for bait fishing and jigging (a combination of a sinker/hook), but it is still a good choice. This one is very delicate as too many loops could cause it to become twisted.
Step 1: Wrap the tag end six or more times around your fishing line. Keep one side open. Keep the end open as you twist.
Step 2: Take your original loop and pass it through the middle.
Step 3: Pull the ends in opposite directions, until they are tightly twisted into coils.
5. The Hangman’s Knot
This knot is a must-know if you’re just starting out. The Uni Knot (Hangman Knot), is one of the most basic knots. It has many uses. It may be useful when you book a charter fishing trip through Ponce Inlet Watersports.
Step 1: Push your tag end through the eye and then bring it side-byside to the standing lines. To create a loop, lay the tag end over the doubled line.
Step 2: Cross the line under the loop and turn around 8 times with the working end.
Step 3: Next, wet the lines. Pull the ends until they are tight. You can either leave the loop or slide the end down to the eye.
6. The Stopper Knot
This knot is for slip bobbers. The Stopper Knot should always be tied just above your bobber. It can be adjusted depending upon the depth of the fish.
Step 1: Measure approximately half of the line.
Step 2: Tie the stopper parallel to your line. Double back to create a loop.
Step 3: Wrap it around the lines 3-4 times (pass the line through each open loop).
Step 4: Pull the ends together to tighten it.
7. The Blood Knot
Although the Blood Knot can’t tie lures or hooks, it can tie fishing lines of various sizes together. It is especially useful when fly fishing in New Smyrna Beach (FL). You might also consider kayaking down the Intracoastal, in addition to deep-sea fishing and fly fishing.
Step 1: Place the two ends of your tag side-by-side for a few inches. Wrap one end around the other at least five times.
Step 2: Wrap the second line five times more on the original. Then, pass the ends through the hole at the middle.
Step 3: Hold the ends of each coil together tightly, until they come together.
8. The Surgeon’s Knot
Similar to the Blood Knot and the Surgeon’s Knot, two fishing lines are also connected by the Surgeon’s Knot. This one requires that the lines be of equal thickness.
Step 1: Stack the lines several inches above one another.
Step 2: Create a loop by tying a simple knot overhand.
Step 3: Pass both the leaders and tag ends through the loop twice.
Step 4: Tighten the four pieces by pulling.
9. The Double Uni Knot
Double Uni Knot is an elevated version of Uni Knot or Hangman. It allows you to securely join two lines.
Step 1: Using a loop to cover the double lines on either side, overlap the ends of the two lines.
Step 2: Wrap the ends of both tags 3-4 times around each line on each side, keeping within the loop.
Step 3: Now tie two uni knots.
Step 4: Secure the knots by slowly tightening the standing lines.
10. The Double Surgeon’s Loop
The Double Surgeon’s Loop Knot is last but not least. This fishing knot will create a strong loop at your leader.
Step 1: Fold the line at the end to make the desired size loop.
Step 2: Tie a single overhand knot. Leave it open so that you can pass the loop through it again.
Step 3: Keep the line and loop in place. Pull the lines until they are tight.
Important Tips for Every fishing hook Knot
There are a few things you should remember, regardless of which fishing knot is chosen.
- Follow these instructions to tie the knot.
- Before you tighten it fully, make sure to add moisture.
- Be careful with the fishing hook and pay attention to the fishing hook eye
- After the knot is tied, trim excess lines
- Practice makes perfect
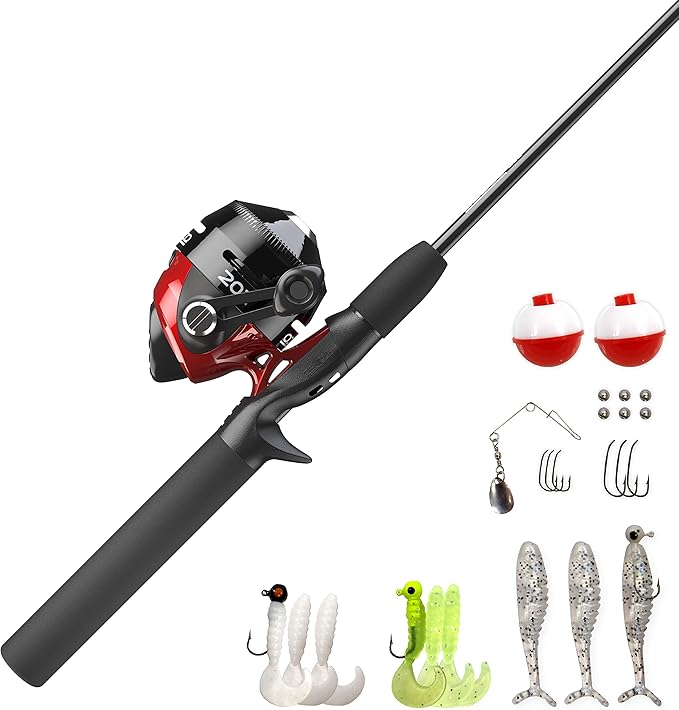
- EASY-TO-USE: The famous Zebco 202 spincast combo features a 5-foot 6-inch 2-piece fishing pole, size 30 fishing reel and 27-piece tackle kit. You will be ready to hit the water with the patented no-tangle design and simple push-button mechanics for ease of use making this reel great for both beginners and experienced anglers
- 27-PIECE TACKLE KIT: The tackle pack comes as a complete set ensuring you are ready to go catch your prize fish right away and includes 6 hooks, 6 split-shot sinkers, 3 swimbaits, 3 jig heads, 6 curly-tail grubs, 1 spinner attachment, and 2 bobbers
- SMOOTH PERFORMANCE: The size 30 spincast reel is constructed with all-metal gears, a 2.8:1 gear ratio and a stainless steel pick-up pin for a silky smooth yet durable performance. Featuring a dial-adjustable drag and QuickSet anti-reverse to stop your handle from moving backward and create a solid hookset in the mouth of a fish when reeling in your catch. The right-hand reel is pre-spooled with 10-pound Cajun fishing line so you can start your fishing adventure sooner
- EXPERTLY DESIGNED: Dependable and designed to last, the 202 spincast combo was expertly designed. A great all-purpose fishing set-up, the easy-casting spincast reel is custom-matched to a durable fiberglass rod to help you to reel in the big ones all day long
- TRUSTED: Since 1949, Zebco has been inviting people to explore the outdoors. Zebco products are warranted for a period of (1) year from date of original retail purchase against defects in workmanship and/or materials


- Key Features – The Calamus Fishing Tackle Storage Bag stores up to (4) 3600 & (1) 3500 size fishing lure boxes with terminal tackle, fishing lures, and fishing tools – Tough, water resistant, long-lasting 600D rip-stop Polyester material – 7 internal and external storage pockets for fishing tackle – padded shoulder bag strap and handle for comfort – Tackle bag dimensions fully expanded including pockets 14.3”x 9”x 7.5”
- Tough and Water Resistant – Calamus tackle bags are made from tough, 600D rip-stop PE material. Durable composite clips to provide exceptional long-term performance and reliability. The inner PVC layer provides protection to ensure your fishing tackle is protected from the elements even as a saltwater tackle bag. A durable 600D PE PVC coated bottom repels moisture and the tacky rubber feet grip any surface so the bag doesn’t slide around inside your boat.
- Easy to Organize – The Calamus tackle bag is perfect for transporting a variety of fishing gear. The main compartment holds up to (4) 3600 size tackle box trays (not included) and the front pocket can hold (1) 3500 size tackle box. Five external zippered and slip pockets offer space to store smaller items such as bags of bait, terminal tackle, tools, rain gear, cell phone, wallet, or other items.
- Functional Design – Designed for function, the adjustable bungee tie-down systems provide quick, easy access to soft baits, rain gear, or tools. Both ends of the bag are equipped with elastic mesh pockets offering more fishing tackle storage for spools, line or bait. Our contrasting zippers and loop pulls are easy to locate and use.
- Comfort and Storage – Our padded shoulder strap and handle provide extra comfort for oversize loads. Calamus tackle bags are comfortable to carry, easy to store, and offer best in class value! Load up your tackle box trays with soft baits, fishing lures, crank baits, jigs, hooks, weights, terminal tackle and rigs
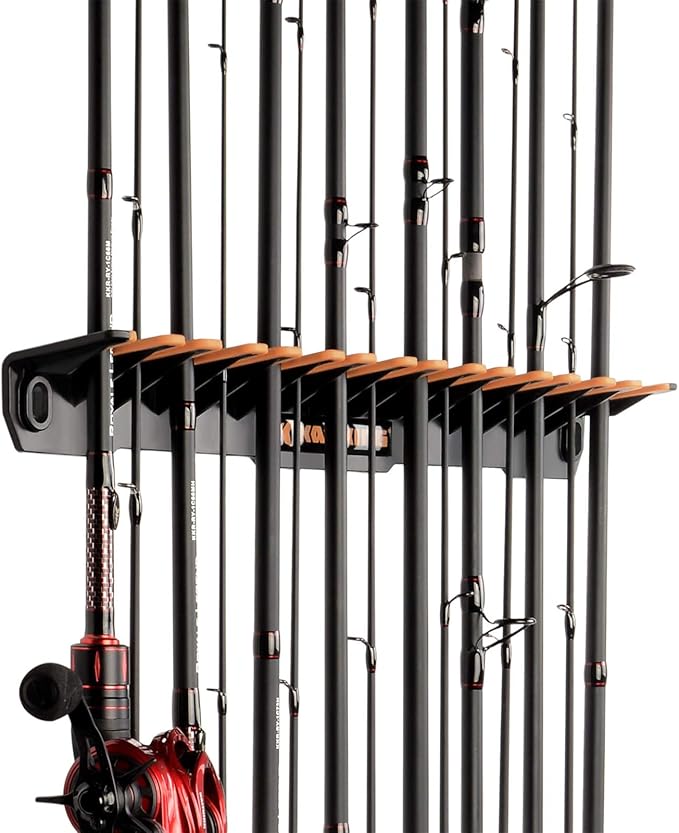
- KEY FEATURES – Store up to 15 fishing rods or fishing rod and reel combos in less than 18” of wall space – Innovative Patented Design (U.S. Patent No.7,237,685) fishing pole holder is easy to use – Easy installation with only 3 screws. Affordable Innovation.
- STORE 15 RODS OR COMBOS – The KastKing V15 vertical fishing rod rack can store up to 15 rods or combos in less than 18 inches of horizontal wall space. Most other brands only store 6 combos in the same amount of space. Rods and combos can be mounted virtually anywhere along the length of the rod, permitting reels to be staggered at different heights for minimum storage space.
- INNOVATIVE DESIGN – This innovative fishing pole rack is simple and easy to use. Simply push the rod firmly into either the large or small v-grooves until the polymer grip material grabs the rod. For additional stability, hang the rod with the thread wrapped line guides just above the v-groove. The tapered v-grooves can accommodate up to a ½” diameter rod with a reel attached. To remove your combo from the fishing rod rack simply grab the rod near the rod rack and pull straight out.
- DURABLE MATERIAL – The KastKing V15 fishing rod holder is molded with tough amorphous polymer material which is resistant to heat, chemicals, and impact. The v-grooves are co-injected with a tacky thermoplastic polymer material to ensure rods and combos are held securely in your rack and doesn’t damage or mar your rods.
- SIMPLE INSTALLATION – KastKing V15 fishing pole racks have 3 mounting holes. 2 outside holes are 16” on center for secure installation on standard-spaced wall studs. To install the rack, determine the correct mounting height for your poles, install one of the outer screws into a stud, level the rack and mark mounting holes, install anchor for center mounting hole, re-level rod rack, install and tighten all screws. The KastKing V15 fishing rod rack will organize your fishing gear and save space.